Blackberry-Lemon Sugar Cookie Bars

A recent night of blackberry picking left me with more blackberries than I could eat plain, so I decided to find something to bake with them. I wanted something that was easy, didn’t require too many ingredients and, most importantly, would taste good with blackberries. After flipping through a Food Network magazine, I decided to make sugar cookie bars–with a twist of blackberries and lemon.


Here’s the recipe I used:

Sugar Cookie Bars

Ingredients:

  • 2 sticks of butter (melted)
  • 1.5 cups of sugar
  • 3 eggs
  • 1 tablespoon vanilla
  • 2 cups flower
  • 1/4 teaspoon salt
  • optional: juice of one lemon, 2 cups blackberries

Melt 2 sticks butter; let cool slightly. Whisk in 1 1/2 cups sugar, 3 eggs and 1 tablespoon vanilla. Stir in 2 cups flour and 1/4 teaspoon salt. Bake until the edges are set but the center is soft, about 25 minutes.
IMG_1155-1 IMG_1158 IMG_1159 IMG_1160

Now, keep in mind the recipe that I used above needed to be modified when I decided to add blackberries and lemon juice. I originally put the bar into the oven for the recommended amount of time, but discovered that, because of the extra liquid from my extra ingredients, the middle of the bar was uncooked even though the outside of the bar was. So, I kept adding five minutes to bake time, inserting a toothpick every time I checked, until the bar was baked in the middle all the way through. In the end, I ended up adding about 15 minutes extra to the bake time–but this could totally depend on how hot your oven gets and what type of pan you use. Because this sugar cookie bar recipe is so basic, I think it would be delicious with a lot of other added ingredients!

Tanti Baci!

Monica-Signature

into the woods we go 🌲🌲🌲

For our second, and last, camping trip of the summer we decided to venture out to Seaquest State Park, in the Mount St. Helens area. The park is on 475 acres and has a mile of the shoreline of Silver Lake and views of the mountain (famous for its eruption in 1980).

MSH80_early_eruption_st_helens_from_NE_04-10-80

The park had a lot of trails for walking and biking and picnic areas, and was located across the street from the Mount St. Helens Visitors Center. Even though there were a lot of campsites, each site had a decent amount of privacy and a good amount of shade from the sun. There were also areas for fishing and boating nearby.

Seaquest-State-Park-Map.mediumthumb.pdf 2T

The park was also easy to get to-a straight shot on the highway, about 2.5 hours from the Eastside. The nearby town of Toutle, WA, although small, has gas and a grocery store if forget anything and is only about 5 minutes away.

Even though there was a burn ban the night we stayed, because of the recent dry weather we’ve been having, Seaquest was still a blast and I recommend it for anyone looking for a beautiful, hassle free campsite.

Tanti baci!

Monica-Signature

Island Time

Being situated in Puget Sound, it’s not uncommon for Seattlites to commute to and from the city by ferry; just as common as getting to the city by bus or car! You can take a ferry from the Seattle piers to any number of areas in the Puget Sound, including Bremerton, Port Orchard and Vashon Island. To check off one of the last items on my summer “to-do list”, I decided to take the ferry to Bainbridge Island.

bainbridge-island

For being only 35 minutes from the city by ferry, Bainbridge feels a world away from the hustle and bustle of Seattle. Bainbridge Island has a more rural, outdoorsy feel with a prominent art scene and quaint shopping and dinning in the Winslow area.

Unknown

If you are visiting Seattle, or just looking for a fun day trip, I highly recommend checking out the ferry to Bainbridge. Being only $8.00 round trip for an adult and $4.00 for kids, its also a good deal!

Tanti Baci!

Monica-Signature

Disneyland Diamond Anniversary~ 60 Years of Magic

Laughter is timeless, imagination has no age, dreams are forever. 

The first time I went to Disneyland I was two years old. Some people say that might be too young for someone to go to a place and make memories, but I don’t think Disneyland is any ordinary place. I’ve gone back to Disneyland every two years for my whole life, I even wrote my admissions essay to NYU on the park, so to say that the theme park is important to me would be an understatement. We went to the 60th anniversary of the park this year in celebration of my sister’s graduation from college, and in two years we will do the same for me. Something I have noticed in all my years going to Disneyland is, while I have changed and times have changed, the theme park and its message will forever stay eternal:

“To all that come to this happy place: welcome. Disneyland is your land. Here age relives fond memories of the past, and here youth may savor the challenge and promise of the future. Disneyland is dedicated to the ideals, the dreams, and the hard facts that have created America… with hope that it will be a source of joy and inspiration to all the world.”


🏢They Will See Us Waving From Such Great Heights🏢

One of the items on my Seattle Summer Bucket List, going to the top of the Columbia Tower, was successfully checked off this 4th of July weekend. I have been to the top of the Space Needle before, another major point in the Seattle skyline, and I must say, the views from Columbia Tower far surpass those at the top of the Needle. The Columbia Tower Sky View Observatory is located on the 73rd floor of the Columbia Tower building, standing at 900 feet (two times taller than the Space Needle!). Columbia Tower Center, which is I believe 76 stories, is currently the tallest building west of the Mississippi and from the observatories panoramic windows you can see lots of Seattle/PNW landmarks like Mt.Baker, the Cascade Mountains, Mt. Reiner, Elliot Bay, Boeing Fields and the Space Needle.

Having been to the top of the Space Needle in Seattle and Rockefeller Center in New York, I know killer views come with a killer price. That was not the case when it came to Columbia Tower! Tickets range from $9.00-$14.00; I paid $9.00 with my student ID. The observatory is open daily from 9am-10 pm, but extends it hours for the 4th of July, closing at 11 pm.

We headed up to the observatory when we first got into the city in the afternoon just to check out the views during the day. Check out some of them below:

Before leaving the observatory to go grab dinner and walk around downtown we got our hands stamped to get back in later to watch the sunset at 9 pm and watch the fireworks display put on at Lake Union at 10:20 pm.

We could not have picked a better view for the 4th of July! From the observatory you could see, not only the Lake Union fireworks show, but also the show being put on in the city of Bellevue and all across other areas of the city.

I highly recommend visiting the Sky Observatory for a fun day or night activity (especially if you want to show off Seattle to people visiting from out of town!).

Tanti Baci!

Monica-Signature

Shoes To Dye For

After coming home from my time in Europe, I went to visit my boyfriend at his college for my birthday. One of the activities of my visit was a paint party, where my entire body (and clothes~evidence below) was drenched in paint. Among the victims of the paint dousing were my beloved Keds. Washing and bleaching got some of the paint out, but they still remained a dingy color with some stains.

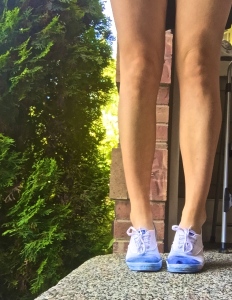
IMG_0086The Keds were still perfectly functional shoes, they just didn’t look that great. So, instead of throwing them away, I decided to take it upon myself to dye them. I didn’t want to do just one solid color, so I decided upon ombreing (is that a word?) them.

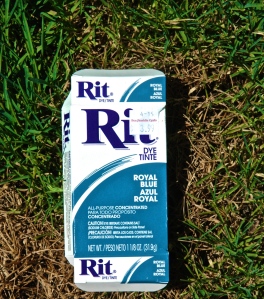
After a quick trip to the craft store, where I picked up some Rit dye, I had everything else I needed at home.

  • shoes (duh)
  • Vaseline
  • a bucket/container
  • measuring cup
  • dye

I am not a particularly crafty person–but I think they turned out pretty well!


Here are the steps I followed:

  1. First, remove the laces and inserts from your shoes, then rinse the shoes under water so the color applies more evenly
    1. DSC_0225
  2. Then prepared the dye, following the instructions on the box; mixing the solution in a bin
    1. DSC_0227DSC_0226 DSC_0229
  3. Apply Vaseline along the rubber sidings of the shoes to prevent the colors from bleeding onto them
  4. Now you’re ready to dye! To make my shoes look ombre I just varied the amount of time I soaked each part of my shoe in:
    1. To make the toe of the shoe the darkest part, soak that part of the shoe in for 10-15 seconds and then dunk it in and out of the dye
    2. Then dip the shoe into the dye again, dipping it more into the mixture so that the dye comes up closer to where the tongue of the shoe is
    3. Dunk the shoe a couple time in and out to this height
    4. Then take a damp paper towel and blend the light and dark colors together to get rid of any harsh lines and make it look more ombre
      1. DSC_0228 DSC_0230
    5. After that, wash your shoes in cool water with a non bleaching detergent and let them dry

I hope this helps if you encounter a similar shoe dilemma, or if you just want something a little different!

IMG_0543 IMG_0533

Tanti Baci!

Monica-Signature

A Monumental Trip- DC Day 3 and 4

After leaving DC for a few days to head to New York to visit my friends, I spent my last couple days in Washington hitting some museums and monuments with my mom.

We started off Thursday by heading to the United States Holocaust Memorial Museum. I visited the museum as a middle schooler, but don’t think I fully appreciated or understood the museum until visiting it as an adult. The museum contains artifacts, documents and photographs that chronicle the events leading up to the holocaust, the holocaust itself and the aftermath. The  museum was truly moving, interesting and powerful. The museum starts handing out tickets at 10 am (when it opens), but only gives out 2200 a day. We arrived at around 8:30 am to get in line–and there were quite a few people ahead of us!

After the museum we headed to Chinatown and then to the Lincoln Memorial to take pictures at sunset and at night-when Lincoln and his memorial light up.

Following our President Lincoln theme, the next morning we headed to Ford’s Theater, where he assassinated on April 14th, 1865. Ford’s Theater, still an operating theater house, had a lot of artifacts regarding Lincoln and that day, including the gun used by John Wilkes Booth and one of the pillows Lincoln laid on as he died. A ticket to get into Ford’s Theater also allows you to enter the Peterson House, the house across the street from the theater that Lincoln was brought to after being shot and later died in.

Our last day in DC brought a torrential downpour–making it hard to do anything outside. So, we spent time in the National Gallery of Art. I’m not a huge art “fan”, but I really enjoyed the photo gallery and furniture pieces they had.

Although it was hot, DC is wonderful in the summer and I can’t wait to make more trips to it in the future.

Tanti Baci!

Monica-Signature

Capital City~DC Day 1🇺🇸

The last time I went to Washington DC was for a school field trip when I was twelve. Well, a lot has changed since then, so I jumped on the opportunity to revisit our nation’s capital with my mother on one of her business trips. My mother spent the day on a work trip to Pennsylvania, leaving me to explore the city by myself. Remembering the last time I was here as a middle schooler, I didn’t handle any of the transportation on my own, so I was a little apprehensive about getting around the city to different sights. As I set off to find the White House and the Washington Monument I discovered that, while being a New Yorker the majority of the year gives me an advantage with cities, any one can find their way around DC. Much like New York, Portland, OR, Barcelona, Philadelphia, Rome and Chicago–Washington DC is a grid system layout making it easy to maneuver what area of the city you are in, and where you want to go.

washington_dc_national_mall_map_west

I set out in the morning after breakfast to get a start on seeing the monuments, I was not only greeted by intense heat and humidity, but also tons of tourists! The downtown area of the city was packed with tourists during the early hours of the day, but it didn’t feel as crowded as NYC does during peak tourist season.

On my way to the Washington Monument I stopped by 1600 Pennsylvania Ave to see the White House. It was packed with tourists so it was hard to get a good shot, but was nice to check out. The Washington Monument is really close to most of the Smithsonian Museums, so after getting pictures of the monument I went to three of the 19 museums: the Museum of Natural History, American History and Air and Space.

By mid day the heat and the walking had me beat, so I was determined to master the subway system and get back to the hotel. Much to my surprise, navigating the city by subway is almost as easy as navigating the city by foot. There are six different lines grouped by color (Red, Blue, Orange, Yellow, Green, Silver) and two different directions. The only aspect that differed from the subway systems I am familiar with- – you scan your metro card as you enter and exit the line.

DC-Metro-map


I think DC is fairly easy to accomplish if you only have a short amount of time (and get less exhausted in the heat than I do!), but i’m glad to have more time here the rest of the week to hit all the major attractions.

Tanti Baci!

Monica-Signature

🌲Into the Woods🌲

The last time I went camping I was wearing a Girl Scout uniform, so for my first back at it I knew I didn’t want anything too “Man vs. Wild”. For the weekend we decided on Lake Easton State Park, a 516 acre camp ground in the foothills of the Cascade Mountains. Our campsite was on the lower loop of the campgrounds and was right next to Yakima River. Though very beautiful, Lake Easton State Park is quite small, so we passed some of the time exploring the neighboring towns of Cle Elum and Easton, WA.

Tanti Baci!

Monica-Signature